Building R2D2 Arms using RPI3 and PCA9685. Also tried a Maestro Micro and RPI3 alone.
RPI3
You can use the RPI3 to use the servos. But the servo power will need to separte from the RPI3. The RPI3’s 5V is not enough to use servos long term. For initial testing they will work. But what you will find is the servos will glitch if connected to the RPI3’s header. The RPI3 causes the glitches. So eventually you need to find an alternative way to run the servos. There are two options I had on hand: a Maestro Mirco and PCA9685.
PCA9685
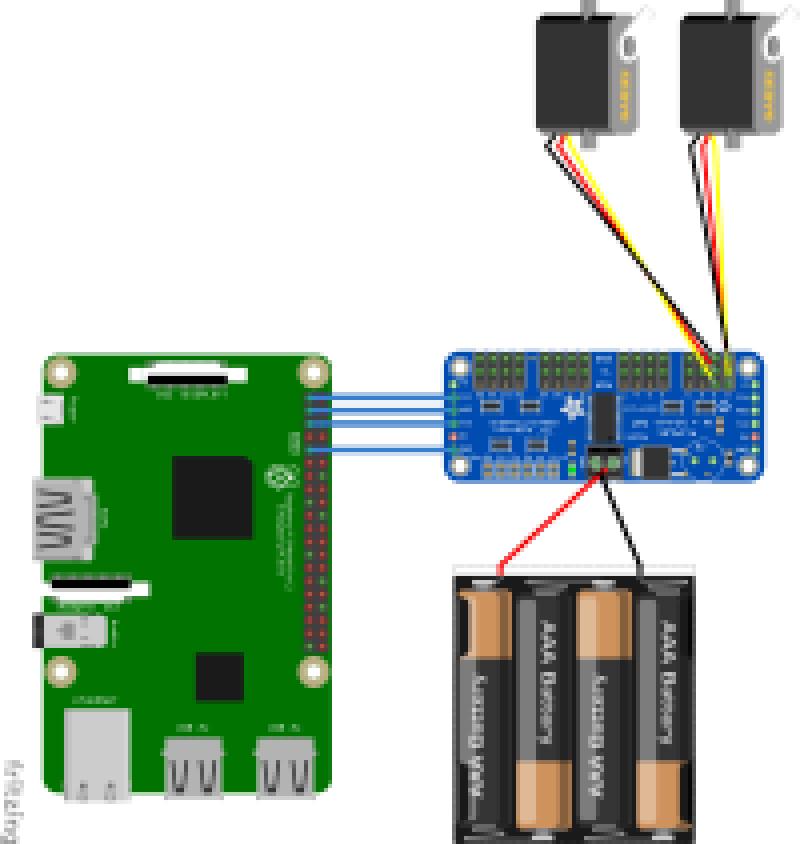
The PCA9685 requires 2 power inputs: 3.3V and 5V. The 3.3V is for the PCA9685 board. The 5V is for the Servo Power. You will use the RPI3’s 3.3V to power the PCA9685 board. But you will need to use an alternative 5V supply to power the servos. The RPI3’s 5V is not enough to power the servos. It may work a little, but it cannot be used long term. The USB cell phone battery charges can be used as the 5V supply.
This board can handle up to 16 servos or motor controllers. On my DonkeyCar I control the steering and motors using this board and it has been very responsive. This should fit all my needs for servo controls. In my dome I will have a lot of servos to control, up to 10 I believe. I may have a separte one of these boards just for the dome. These boards can also be daisy chained. You just need to change the address by soldering 2 pads together.
Next step, create a Node and Topic and wires this all up to the Flask API.
fromadafruit_servokitimportServoKitimporttimeclassAdafruitServoControl:"""
Use the Adafruit PCA9685 board to control the servos.
https://learn.adafruit.com/adafruit-16-channel-servo-driver-with-raspberry-pi?view=all
pip install adafruit-circuitpython-servokit
sudo apt-get install python-smbus
sudo apt-get install i2c-tools
"""def__init__(self,min_servo=750,max_servo=2500):"""
Initialize the maestro. Set the comm port if you need to set the specific. Set the min
and max servo pulse width if not default.
:param comm_port: Comm port of the maestro.
:param min_servo: Min servo pulse width in quarter seconds.
:param max_servo: Max servo pulse width in quarter seconds.
"""self.kit=None# Hold the Adafruit Servokitself.min_servo=min_servo# Min pulse width of servo in quarter secondsself.max_servo=max_servo# Max pulse width of servo in quarter secondsself.setup_controller()# Setup maestrodefsetup_controller(self):"""
Setup the maestro controller
:return:
"""self.kit=ServoKit(channels=16)self.kit.servo[0].set_pulse_width_range(self.min_servo,self.max_servo)self.kit.servo[1].set_pulse_width_range(self.min_servo,self.max_servo)self.kit.servo[0].angle=0self.kit.servo[1].angle=0defcenter(self):"""
Center the servo.
:return:
"""self.set_angle(0.0)# CENTER (6000)defset_angle(self,chan,angle):"""
Set the servo to the given angle.
:param chan: Servo channel to move
:param angle: Angle to move the servo
:return:
"""ifangle>180:angle=180ifangle<0:angle=0self.kit.servo[chan].angle=angleprint("Chan: "+str(chan)+" angle: "+str(self.kit.servo[chan].angle))if__name__=='__main__':servo=AdafruitServoControl()time.sleep(1.0)servo.set_angle(0,180)servo.set_angle(1,180)time.sleep(1.5)servo.set_angle(0,0)servo.set_angle(1,0)