You can use the RPI3 to use the servos. But the servo power will need to separte from the RPI3. The RPI3’s 5V is not enough to use servos long term. For initial testing they will work. But what you will find is the servos will glitch if connected to the RPI3’s header. The RPI3 causes the glitches. So eventually you need to find an alternative way to run the servos. There are two options I had on hand: a Maestro Mirco and PCA9685.
I included some basic code to just make the servo work. I also added the actual code I used to control the arms through the RPI3.
Read here on the Flask UI setup.
Function for Angle to Duty Cycle
The difficult part with controlling the servo with a RPI3 is the value you use to move the servo. The value is given as a duty cycle. I looked around how to convert an angle to duty cycle. I finally found one that worked with my servos. I am using Tower Pro MG995. This function should work for must people, but you can change it if needed.
 1
 2
 3
 4
 5
 6
 7
 8
 9
10
@staticmethoddefcalc_duty_cycle_from_angle(angle):"""
Calculate the duty cycle based off the angle given. Then
move the servo based off this angle.
:param angle:
:return: Duty cycle for servo based off angle.
"""#return ((angle / 180.0) + 1.0) * 5.0returnangle/18.0+3.0
Schematic
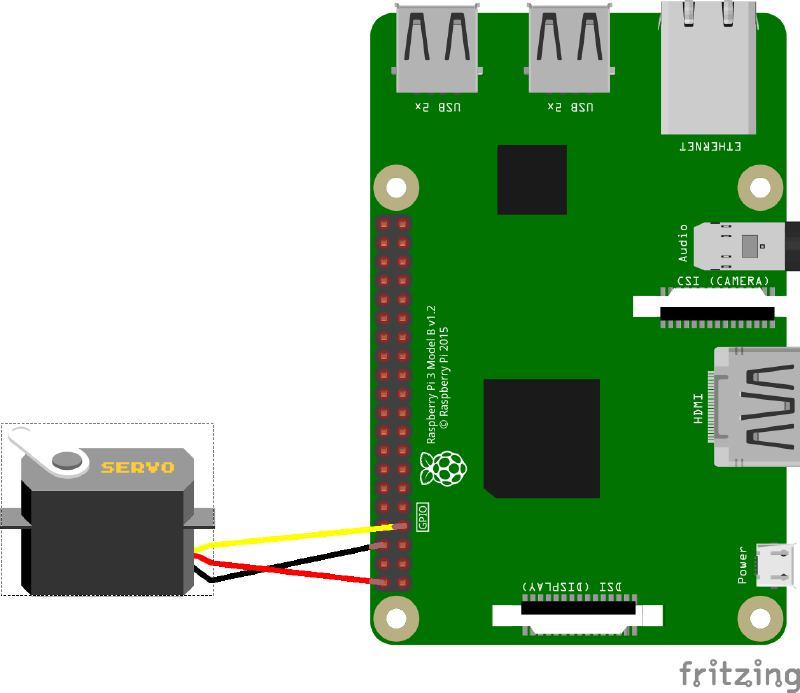
Connect the servos to the RPI3 directly.
Servo Color Code
1
2
3
Brown  = GND
Red    = Power
Orange = Signal
Pinout
1
2
3
Orange -> Pin 7 (RPI3 GPIO 4)
Red    -> Pin 2 (RPI3 5V)
Brown  -> Pin 6 (RPI3 GND)
importRPi.GPIOasGPIOimporttimeimportsysclassRpi3ServoControl:"""
Use the RPI3 to control the servos.
"""def__init__(self,servo_pin,init_angle=0.0):self.servo_pin=servo_pinself.gpio_pin=Noneself.last_angle=0.0self.setup_pin()# Setup GPIO pinself.set_angle(init_angle)defsetup_pin(self):"""
Setup the GPIO pin. Use the GPIO pin given in the constructor.
:return:
"""GPIO.setmode(GPIO.BCM)# Setup GPIO pin to BCMGPIO.setup(self.servo_pin,GPIO.OUT)# Set GPIO pin to outputself.gpio_pin=GPIO.PWM(self.servo_pin,50)# GPIO PWM with 50Hzself.gpio_pin.start(2.5)# Initializationdefshutdown(self):"""
Shutdown the object. This will properly shutdown everything.
:return:
"""self.gpio_pin.stop()GPIO.cleanup()defcenter(self):"""
Center the servo.
:return:
"""self.set_angle(0.0)# CENTER (7.5)defset_angle(self,angle):"""
Set the servo to the given angle.
:param angle: Angle to move the servo
:return:
"""ifangle>180:angle=180ifangle<0:angle=0# Cacluate the duty cycle to move to that angledc=Rpi3ServoControl.calc_duty_cycle_from_angle(angle)print("Pin: "+str(self.servo_pin)+" Angle: "+str(angle)+" DC: "+str(dc))# Move the servoself.gpio_pin.ChangeDutyCycle(dc)time.sleep(0.1)# Record the last angleself.last_angle=angle@staticmethoddefcalc_duty_cycle_from_angle(angle):"""
Calculate the duty cycle based off the angle given. Then
move the servo based off this angle.
:param angle:
:return: Duty cycle for servo based off angle.
"""#return ((angle / 180.0) + 1.0) * 5.0returnangle/18.0+3.0if__name__=='__main__':iflen(sys.argv)>1:print("Using Servo Pin "+sys.argv[1])rpi3_servo=Rpi3ServoControl(int(sys.argv[1]))else:print("Using Servo Pin 4")rpi3_servo=Rpi3ServoControl(4)iflen(sys.argv)>2:angle_list=sys.argv[2:]print("Angles to try: "+str(sys.argv[2:]))foridxinrange(len(angle_list)):rpi3_servo.set_angle(float(angle_list[idx]))time.sleep(0.5)rpi3_servo.shutdown()
Basic Code
In this example, I connected the servo signal pin to RPI3 GPIO pin 4. This will then open and close the servo.